How To Install AODV.H Packages in Ns2
To import Aodv.h_ packages in NS2 it is best to get experts help so see to our page about the installation steps. Get any type of research help from us. The AODV (Ad hoc On-Demand Distance Vector) routing protocol is defined in the aodv.h file. This protocol is widely used in mobile ad hoc networks (MANETs) and is specifically designed to create routes between nodes only when required. Within the aodv.h file, you’ll find the class declarations and methods essential for AODV’s route discovery, maintenance, and error handling. AODV efficiently discovers routes through a mechanism involving route requests (RREQ) and route replies (RREP), making it particularly effective in environments with changing topologies. When a node wants to communicate with another node but lacks an existing route, it sends out a RREQ to find one. Once the route is set up, it remains active only as long as needed. If a connection fails, the protocol either repairs the existing route or seeks an alternative. Additionally, a route error (RERR) message is dispatched to inform nodes about any broken links in the established route.
PRE-REQUISITES:
- Fresh installation of Ubuntu 16.04 LTS:
Screenshot:

2.NS-2.35 Installation:
Screenshot:

Here, Percentage (%) symbol Denotes the successful installation of the NS 2.35 Simulator.
Screenshot:

HEADER FILE VERIFICATION:
- Locate to the ns-2.35 folder:
Screenshot:

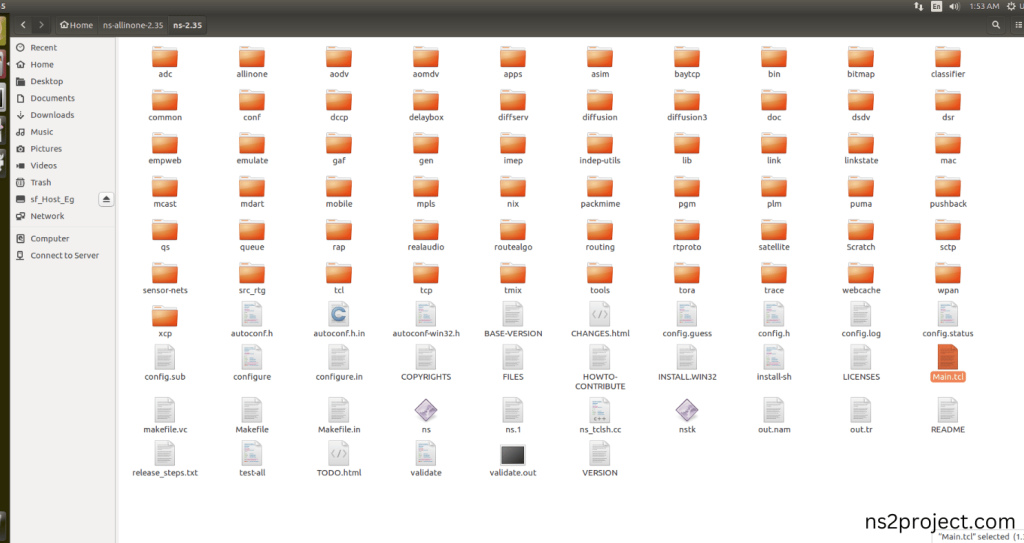
2.Create the Main.tcl file in the scratch folder:
Next we need to create the Main.tcl file by using text editor in the ns-2.35 folder.
Screenshot:

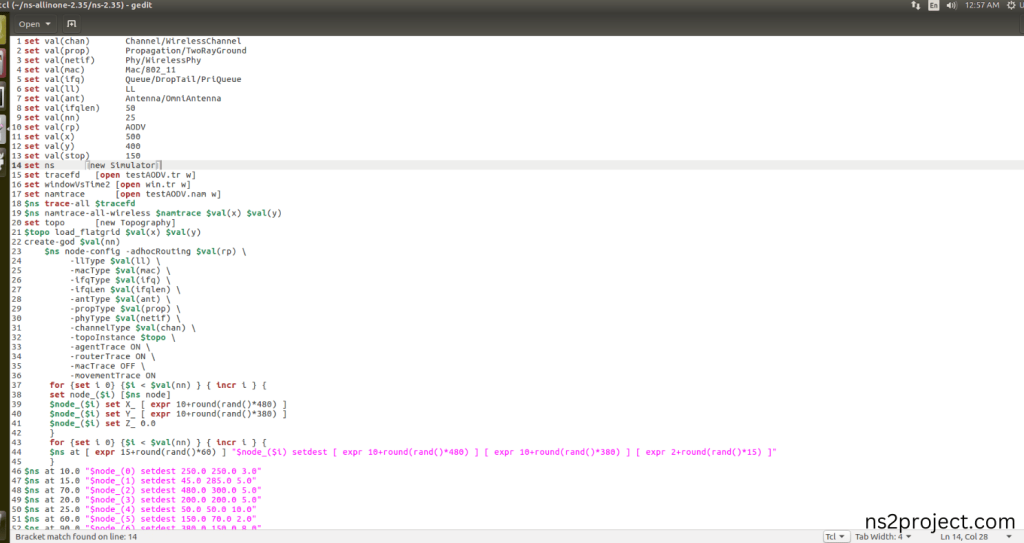
Next we need to paste the below code to the Main.tcl file and save the file in the ns-2.35 folder.
Code:
set val(chan) Channel/WirelessChannel
set val(prop) Propagation/TwoRayGround
set val(netif) Phy/WirelessPhy
set val(mac) Mac/802_11
set val(ifq) Queue/DropTail/PriQueue
set val(ll) LL
set val(ant) Antenna/OmniAntenna
set val(ifqlen) 50
set val(nn) 25
set val(rp) AODV
set val(x) 500
set val(y) 400
set val(stop) 150
set ns [new Simulator]
set tracefd [open testAODV.tr w]
set windowVsTime2 [open win.tr w]
set namtrace [open testAODV.nam w]
$ns trace-all $tracefd
$ns namtrace-all-wireless $namtrace $val(x) $val(y)
set topo [new Topography]
$topo load_flatgrid $val(x) $val(y)
create-god $val(nn)
$ns node-config -adhocRouting $val(rp) \
-llType $val(ll) \
-macType $val(mac) \
-ifqType $val(ifq) \
-ifqLen $val(ifqlen) \
-antType $val(ant) \
-propType $val(prop) \
-phyType $val(netif) \
-channelType $val(chan) \
-topoInstance $topo \
-agentTrace ON \
-routerTrace ON \
-macTrace OFF \
-movementTrace ON
for {set i 0} {$i < $val(nn) } { incr i } {
set node_($i) [$ns node]
$node_($i) set X_ [ expr 10+round(rand()*480) ]
$node_($i) set Y_ [ expr 10+round(rand()*380) ]
$node_($i) set Z_ 0.0
}
for {set i 0} {$i < $val(nn) } { incr i } {
$ns at [ expr 15+round(rand()*60) ] “$node_($i) setdest [ expr 10+round(rand()*480) ] [ expr 10+round(rand()*380) ] [ expr 2+round(rand()*15) ]”
}
$ns at 10.0 “$node_(0) setdest 250.0 250.0 3.0”
$ns at 15.0 “$node_(1) setdest 45.0 285.0 5.0”
$ns at 70.0 “$node_(2) setdest 480.0 300.0 5.0”
$ns at 20.0 “$node_(3) setdest 200.0 200.0 5.0”
$ns at 25.0 “$node_(4) setdest 50.0 50.0 10.0”
$ns at 60.0 “$node_(5) setdest 150.0 70.0 2.0”
$ns at 90.0 “$node_(6) setdest 380.0 150.0 8.0”
$ns at 42.0 “$node_(7) setdest 200.0 100.0 15.0”
$ns at 55.0 “$node_(8) setdest 50.0 275.0 5.0”
$ns at 19.0 “$node_(9) setdest 250.0 250.0 7.0”
set tcp [new Agent/TCP/Newreno]
$tcp set class_ 2
set sink [new Agent/TCPSink]
$ns attach-agent $node_(2) $tcp
$ns attach-agent $node_(11) $sink
$ns connect $tcp $sink
set ftp [new Application/FTP]
$ftp attach-agent $tcp
$ns at 10.0 “$ftp start”
proc plotWindow {tcpSource file} {
global ns
set time 0.01
set now [$ns now]
set cwnd [$tcpSource set cwnd_]
puts $file “$now $cwnd”
$ns at [expr $now+$time] “plotWindow $tcpSource $file”
}
$ns at 10.1 “plotWindow $tcp $windowVsTime2”
set tracefd [open testAODV.tr w]
set namtrace [open testAODV.nam w]
$ns trace-all $tracefd
$ns namtrace-all-wireless $namtrace $val(x) $val(y)
for {set i 0} {$i < $val(nn) } { incr i } {
$ns initial_node_pos $node_($i) 30
}
for {set i 0} {$i < $val(nn) } { incr i } {
$ns at $val(stop) “$node_($i) reset”;
}
$ns at $val(stop) “$ns nam-end-wireless $val(stop)”
$ns at $val(stop) “stop”
$ns at 150 “puts \”end simulation\” ; $ns halt”
proc stop {} {
global ns tracefd namtrace
$ns flush-trace
close $tracefd
close $namtrace
exec nam testAODV.nam &
exit 0
}
$ns run
Screenshot:

3.Open the Terminal:
Next, we need to launch the terminal by right clicking the mouse in the ns-2.35 location.
Screenshot:

Screenshot:

4.NS-2.35 Configuration && Building Process:
Next, we need to configure and build the ns-2.35 folder to make the Created files need to work in ns-2.35 configuration.
Command: “./make”
Screenshot:

Screenshot:

Screenshot:

Here, NS-2.35 Building process completed successfully.
3.Importing Aodv.h:
Here we imported the Aodv.h header file code indirectly accessed the Aodv class used in the Tcl script (set val(rp) AODV ) are used to configure the AODV Routing protocol in this Network. This configuration helps manage Routing process in the network in this example program. Here we highlighted the code line that highlighted which is internally accessed Aodv.h, we will show class file that used in this code via Aodv folder.
Screenshot:

Screenshot:

Here we will show the header file by opening Aodv.h file to show the class or function imported from the Aodv.h in the example code. This Tcl Script Line (set val(rp) AODV ) are used to configure the AODV Routing protocol in this Network. This configuration helps to manage Routing process between nodes in the network and Aodv function ( AODV(nsaddr_t id); ) that interprets that Tcl command. When the Tcl script executes this line, Aodv will be managed across all the links in each Nodes during the simulation.
Screenshot:

Screenshot:

5.Executing the Example Program for Aodv Header:
Then we need to run the Example program for Aodv Header to view output of the program.
Command: “./ns Main.tcl”
Screenshot:

Here we shown the output of the example program by using Aodv.h.
Screenshot:

Screenshot:

Screenshot:

In the NS 2.35 Simulation Example Program, the Aodv.h Header file is successfully imported.
If you have any questions about Aodv.h_Importation for your project, feel free to contact us! We’re here to help you achieve the best outcomes. Additionally, you can explore tailored research services at ns2projects.com.


