How To Install APP.h Packages in Ns2
To import APP.h packages in NS2 tool have a look at the ideas we have shared, if you want to get experts help contact us . In this section, we will discuss the App (Application) class found in the app.h file, which lays the groundwork for simulating various network applications that operate on transport layer protocols like TCP and UDP. The app.h file includes class declarations for applications that create traffic and engage with transport agents during the simulation. It acts as a foundational class from which specific application types, such as FTP, CBR, and Telnet, are developed. The Application layer in NS-2 mimics the behavior of real-world applications by generating traffic patterns and interacting with the underlying transport protocols to facilitate data transmission and reception. The class defined in app.h outlines crucial methods for managing the application lifecycle, including starting, stopping, and configuring traffic. Key features of the App class encompass sending and receiving data through connected transport agents (TCP/UDP), simulating various traffic types (like file transfers and real-time streaming), and controlling the timing of application traffic generation. In the TCL script, users can configure and manage application behavior by utilizing predefined application types that derive from the base class in app.h.
Learn how to efficiently manage App.h packages in NS2. Keep in touch with us for helpful tips and tricks to get the best outcomes in your projects!
PRE-REQUISITES:
- Fresh installation of Ubuntu 16.04 LTS:
Screenshot:

2.NS-2.35 Installation:
Screenshot:

Here, Percentage (%) symbol Denotes the successful installation of the NS 2.35 Simulator.
Screenshot:

HEADER FILE VERIFICATION:
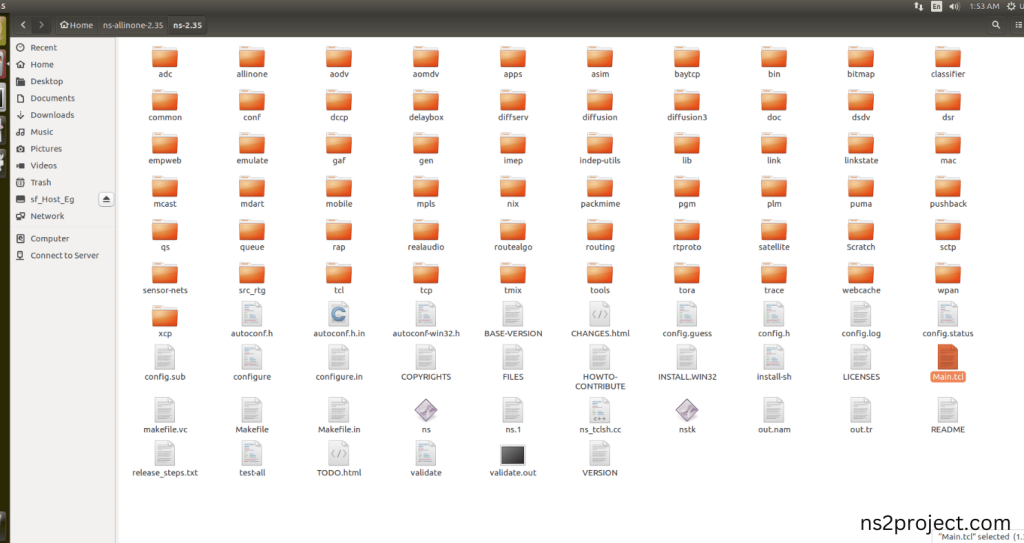
- Locate to the ns-2.35 folder:
Screenshot:

2.Create the Main.tcl file in the scratch folder:
Next we need to create the Main.tcl file by using text editor in the ns-2.35 folder.
Screenshot:

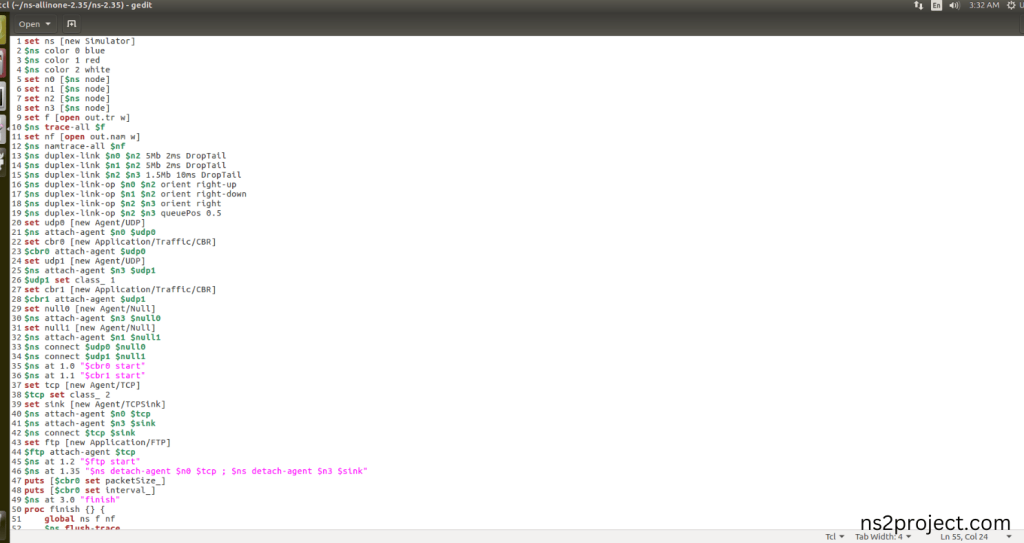
Next we need to paste the below code to the Main.tcl file and save the file in the ns-2.35 folder.
Code:
set ns [new Simulator]
$ns color 0 blue
$ns color 1 red
$ns color 2 white
set n0 [$ns node]
set n1 [$ns node]
set n2 [$ns node]
set n3 [$ns node]
set f [open out.tr w]
$ns trace-all $f
set nf [open out.nam w]
$ns namtrace-all $nf
$ns duplex-link $n0 $n2 5Mb 2ms DropTail
$ns duplex-link $n1 $n2 5Mb 2ms DropTail
$ns duplex-link $n2 $n3 1.5Mb 10ms DropTail
$ns duplex-link-op $n0 $n2 orient right-up
$ns duplex-link-op $n1 $n2 orient right-down
$ns duplex-link-op $n2 $n3 orient right
$ns duplex-link-op $n2 $n3 queuePos 0.5
set udp0 [new Agent/UDP]
$ns attach-agent $n0 $udp0
set cbr0 [new Application/Traffic/CBR]
$cbr0 attach-agent $udp0
set udp1 [new Agent/UDP]
$ns attach-agent $n3 $udp1
$udp1 set class_ 1
set cbr1 [new Application/Traffic/CBR]
$cbr1 attach-agent $udp1
set null0 [new Agent/Null]
$ns attach-agent $n3 $null0
set null1 [new Agent/Null]
$ns attach-agent $n1 $null1
$ns connect $udp0 $null0
$ns connect $udp1 $null1
$ns at 1.0 “$cbr0 start”
$ns at 1.1 “$cbr1 start”
set tcp [new Agent/TCP]
$tcp set class_ 2
set sink [new Agent/TCPSink]
$ns attach-agent $n0 $tcp
$ns attach-agent $n3 $sink
$ns connect $tcp $sink
set ftp [new Application/FTP]
$ftp attach-agent $tcp
$ns at 1.2 “$ftp start”
$ns at 1.35 “$ns detach-agent $n0 $tcp ; $ns detach-agent $n3 $sink”
puts [$cbr0 set packetSize_]
puts [$cbr0 set interval_]
$ns at 3.0 “finish”
proc finish {} {
global ns f nf
$ns flush-trace
close $f
close $nf
puts “running nam…”
exec nam out.nam &
exit 0
}
$ns run

Open the Terminal:
Next, we need to launch the terminal by right clicking the mouse in the ns-2.35 location.
Screenshot:

Screenshot:

3.NS-2.35 Configuration && Building Process:
Next, we need to configure and build the ns-2.35 folder to make the Created files need to work in ns-2.35 configuration.
Command: “./make”
Screenshot:

Screenshot:

Screenshot:

Here, NS-2.35 Building process completed successfully.
3.Importing App.h:
Here we imported the App.h header file code indirectly accessed the App class used in the Tcl script (set cbr0 [new Application/Traffic/CBR]) are used to configure the Application for Traffic in this Network. This configuration helps to create Application for traffic process in the network in this example program. Here we highlighted the code line that highlighted which is internally accessed App.h, we will show class file that used in this code via App folder.
Screenshot:

Screenshot:

Here we will show the header file by opening App.h file to show the class or function imported from the App.h in the example code. This Tcl Script Line (set cbr0 [new Application/Traffic/CBR]) are used to configure the Application for Traffic in this Network. This configuration helps to create Application for Traffic process between nodes in the network. When the Tcl script executes this line, App will be managed across all the links in each Nodes during the simulation.
Screenshot:

Screenshot:

4.Executing the Example Program for App Header:
Then we need to run the Example program for App Header to view output of the program.
Command: “./ns Main.tcl”
Screenshot:

Here we shown the output of the example program by using App.h.
Screenshot:

Screenshot:

Screenshot:

In the NS 2.35 Simulation Example Program, the App.h Header file is successfully imported. If you have any questions about the APP.h packages for your project, feel free to contact us! We are dedicated to helping you achieve outstanding results. Additionally, you can explore tailored research services at ns2projects.com.


